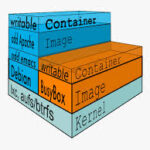
一直在按照传统的观念想像如何更方便的使用Docker,如新建一个Docker容器(CONTAINER),通过ssh登录上去然后搭建上各种应用服务。但貌似Docker的理念就不是这样的,每一个单一应用作为一个独立的服务来使用,可规划到SaaS上来,不必追求大而全。不过我还是比较倾向于至少一个服务要有主应用如:apache,然后有sshd,这样可以登录上去进行各种配置,而不是每次都在Docker上创建新的容器,并把配置add进去。。。
下面是呕心沥血的一些测试总结,网上的各种资料都是Ubuntu居多,CentOS的相对较少,在一个周末的google与测试中,原来docker build之后中ssh无法登录的错误“debug1: Exit status 254”终于解决了,同样解决了之前文章《Docker运行在CentOS6.5下的初体验》中遇到的问题。
Dockerfile文件
# cat Dockerfile
# fisher/centos:sshd
#
# VERSION               0.0.1

FROM        centos:6.4
MAINTAINER  Fisher “fisher@sudops.com"

RUN         yum install -y openssh openssh-server openssh-clients httpd
RUN         mkdir /var/run/sshd
#RUN          ssh-keygen -t rsa1 -f /etc/ssh/ssh_host_rsa_key
RUN          ssh-keygen -t rsa -f /etc/ssh/ssh_host_rsa_key
RUN         ssh-keygen -t dsa -f /etc/ssh/ssh_host_dsa_key
RUN         /bin/echo 'root:mypwd' |chpasswd
RUN         useradd fisher
RUN         /bin/echo 'fisher:mypwd' |chpasswd
RUN         /bin/sed -i 's/.*session.*required.*pam_loginuid.so.*/session optional pam_loginuid.so/g' /etc/pam.d/sshd
RUN         /bin/echo -e "LANG=\"en_US.UTF-8\"" > /etc/default/local
EXPOSE      22
EXPOSE      80
CMD         /usr/sbin/sshd -D
创建新的docker images
# docker build -rm -t fisher/centos:ssh .
Uploading context 6.656 kB
Uploading context
Step 0 : FROM        centos:6.4
 ---> 539c0211cd76
Step 1 : MAINTAINER  Fisher "fisher@sudops.com"
 ---> Using cache
 ---> 490cb10579ca
Step 2 : RUN         yum install -y openssh openssh-server openssh-clients httpd
 ---> Using cache
 ---> 3d4d9ccbd3cd
Step 3 : RUN         mkdir /var/run/sshd
 ---> Using cache
 ---> 5e0b448e2530
Step 4 : RUN      ssh-keygen -t rsa -f /etc/ssh/ssh_host_rsa_key
 ---> Running in 656f5aa5e1ac
Generating public/private rsa key pair.
Your identification has been saved in /etc/ssh/ssh_host_rsa_key.
Your public key has been saved in /etc/ssh/ssh_host_rsa_key.pub.
The key fingerprint is:
84:28:29:2b:13:6f:d9:07:95:44:4e:cb:26:47:eb:42 root@656f5aa5e1ac
The key's randomart image is:
+--[ RSA 2048]----+
|     o*.         |
|   . B.+         |
|o o E O .        |
| = = * .         |
|+ + o o S        |
|.o   o           |
|                 |
|                 |
|                 |
+-----------------+
 ---> 40421b090390
Step 5 : RUN         ssh-keygen -t dsa -f /etc/ssh/ssh_host_dsa_key
 ---> Running in 1829dc0e6a46
Generating public/private dsa key pair.
Your identification has been saved in /etc/ssh/ssh_host_dsa_key.
Your public key has been saved in /etc/ssh/ssh_host_dsa_key.pub.
The key fingerprint is:
3d:d0:95:b7:43:b9:99:df:ba:3b:e8:ad:3b:d4:2e:83 root@656f5aa5e1ac
The key's randomart image is:
+--[ DSA 1024]----+
|            .. . |
|         . .. +  |
|        . .  o = |
|         o    *  |
|        S o  . o.|
|           .. . o|
|           o o . |
|          E =.+  |
|           .+*++ |
+-----------------+
 ---> 633af93f6e0c
Step 6 : RUN         /bin/echo 'root:mypwd' |chpasswd
 ---> Running in 8417fa1a7922
 ---> 310eafbe7318
Step 7 : RUN         useradd fisher
 ---> Running in 641965474f8b
 ---> 3e21e1b2819c
Step 8 : RUN         /bin/echo 'fisher:mypwd' |chpasswd
 ---> Running in f93ba97f99ac
 ---> 9cf5c042e391
Step 9 : RUN         /bin/sed -i 's/.*session.*required.*pam_loginuid.so.*/session optional pam_loginuid.so/g' /etc/pam.d/sshd
 ---> Running in 39de493f9cee
 ---> 909c3e844453
Step 10 : RUN         /bin/echo -e "LANG=\"en_US.UTF-8\"" > /etc/default/local
 ---> Running in 35c1972b7bec
 ---> b38f36752245
Step 11 : EXPOSE      22
 ---> Running in 854c7c5fe7f4
 ---> 73b6d090d40a
Step 12 : EXPOSE      80
 ---> Running in 29d0d1ca9112
 ---> 056b4be65fe2
Step 13 : CMD         /usr/sbin/sshd -D
 ---> Running in 2882924c7358
 ---> c4e075623d64
Successfully built c4e075623d64
Removing intermediate container 656f5aa5e1ac
Removing intermediate container 1829dc0e6a46
Removing intermediate container 8417fa1a7922
Removing intermediate container 39de493f9cee
Removing intermediate container 35c1972b7bec
Removing intermediate container 641965474f8b
Removing intermediate container f93ba97f99ac
Removing intermediate container 854c7c5fe7f4
Removing intermediate container 29d0d1ca9112
Removing intermediate container 2882924c7358
看看这次新生成的images
# docker images
REPOSITORY          TAG                 IMAGE ID            CREATED             VIRTUAL SIZE
fisher/centos       ssh                 c4e075623d64        37 minutes ago      369.7 MB
ubuntu              13.10               9f676bd305a4        5 weeks ago         182.1 MB
ubuntu              saucy               9f676bd305a4        5 weeks ago         182.1 MB
ubuntu              raring              eb601b8965b8        5 weeks ago         170.2 MB
ubuntu              13.04               eb601b8965b8        5 weeks ago         170.2 MB
ubuntu              12.10               5ac751e8d623        5 weeks ago         161.4 MB
ubuntu              quantal             5ac751e8d623        5 weeks ago         161.4 MB
ubuntu              10.04               9cc9ea5ea540        5 weeks ago         183 MB
ubuntu              lucid               9cc9ea5ea540        5 weeks ago         183 MB
ubuntu              12.04               9cd978db300e        5 weeks ago         204.7 MB
ubuntu              latest              9cd978db300e        5 weeks ago         204.7 MB
ubuntu              precise             9cd978db300e        5 weeks ago         204.7 MB
centos              6.4                 539c0211cd76        11 months ago       300.6 MB
centos              latest              539c0211cd76        11 months ago       300.6 MB
运行Docker及一些基本操作:
# docker run -d -p 192.168.2.166:2222:22 -p 8000:80 fisher/centos:ssh
a33f56ffbe79e660c48632ce683f900aca895fc2db115b3eb615a1b8ae7726f4
# docker ps
CONTAINER ID        IMAGE               COMMAND                CREATED             STATUS              PORTS                                              NAMES
a33f56ffbe79        fisher/centos:ssh   /bin/sh -c /usr/sbin   3 seconds ago       Up 1 seconds        192.168.2.166:2222->22/tcp, 0.0.0.0:8000->80/tcp   jovial_archimedes

# netstat -lntp
Active Internet connections (only servers)
Proto Recv-Q Send-Q Local Address               Foreign Address             State       PID/Program name
tcp        0      0 192.168.2.166:2222          0.0.0.0:*                   LISTEN      1076/docker
tcp        0      0 0.0.0.0:22                  0.0.0.0:*                   LISTEN      961/sshd
tcp        0      0 :::22                       :::*                        LISTEN      961/sshd
tcp        0      0 :::8000                     :::*                        LISTEN      1076/docker
从Docker宿主上登录
# ssh -vv 192.168.2.166 -p 2222
-bash-4.1#
使用普通账户登录
# ssh fisher@172.17.0.2
fisher@172.17.0.2's password:
[fisher@a33f56ffbe79 ~]$
ssh登录Docker之后的操作
-bash-4.1#
-bash-4.1# netstat -lntp
Active Internet connections (only servers)
Proto Recv-Q Send-Q Local Address               Foreign Address             State       PID/Program name
tcp        0      0 0.0.0.0:22                  0.0.0.0:*                   LISTEN      1/sshd
tcp        0      0 :::22                       :::*                        LISTEN      1/sshd
-bash-4.1# /etc/init.d/httpd start
Starting httpd: httpd: Could not reliably determine the server's fully qualified domain name, using 172.17.0.2 for ServerName
                                                           [  OK  ]
-bash-4.1# netstat -lntp
Active Internet connections (only servers)
Proto Recv-Q Send-Q Local Address               Foreign Address             State       PID/Program name
tcp        0      0 0.0.0.0:22                  0.0.0.0:*                   LISTEN      1/sshd
tcp        0      0 :::80                       :::*                        LISTEN      25/httpd
tcp        0      0 :::22                       :::*                        LISTEN      1/sshd

-bash-4.1# echo “live” > /var/www/html/index.html
apache服务测试:
-bash-4.1# curl -v http://127.0.0.1
* About to connect() to 127.0.0.1 port 80 (#0)
*   Trying 127.0.0.1... connected
* Connected to 127.0.0.1 (127.0.0.1) port 80 (#0)
> GET / HTTP/1.1
> User-Agent: curl/7.19.7 (x86_64-redhat-linux-gnu) libcurl/7.19.7 NSS/3.13.6.0 zlib/1.2.3 libidn/1.18 libssh2/1.4.2
> Host: 127.0.0.1
> Accept: */*
>
< HTTP/1.1 200 OK
< Date: Sun, 16 Mar 2014 10:42:27 GMT
< Server: Apache/2.2.15 (CentOS)
< Last-Modified: Sun, 16 Mar 2014 10:42:02 GMT
< ETag: "603eb-5-4f4b6f40be1a1"
< Accept-Ranges: bytes
< Content-Length: 5
< Connection: close
< Content-Type: text/html; charset=UTF-8
<
live
* Closing connection #0
从其他的服务器上测试httpd服务
# curl -v http://192.168.2.166:8000
* About to connect() to 192.168.2.166 port 8000 (#0)
*   Trying 192.168.2.166... connected
* Connected to 192.168.2.166 (192.168.2.166) port 8000 (#0)
> GET / HTTP/1.1
> User-Agent: curl/7.19.7 (x86_64-redhat-linux-gnu) libcurl/7.19.7 NSS/3.14.0.0 zlib/1.2.3 libidn/1.18 libssh2/1.4.2
> Host: 192.168.2.166:8000
> Accept: */*
>
< HTTP/1.1 200 OK
< Date: Sun, 16 Mar 2014 10:43:32 GMT
< Server: Apache/2.2.15 (CentOS)
< Last-Modified: Sun, 16 Mar 2014 10:42:02 GMT
< ETag: "603eb-5-4f4b6f40be1a1"
< Accept-Ranges: bytes
< Content-Length: 5
< Connection: close
< Content-Type: text/html; charset=UTF-8
<
live
* Closing connection #0
总结,现在终于搭建好了一个可以ssh登录进行配置的docker image,并对httpd服务进行了端口映射,如果需要其他服务可以基于这个image再进行创建。

Pingback: 提交自己的centos6.4 sshd-httpd image到docker.io上 | 运维·速度
多谢你,节约了我宝贵时间。
客气,共同学习 😛